5 Simple Moves That Tone Your Belly, Butt, and Thighs
Target three common trouble zones at once with this quick strength routine.
Remember the ThighMaster? The butterfly-shaped exercise device created by Suzanne Somers promised to trim and tone your thighs-and at least 10 million people bought it.
Then there's the Ab Roller, which "revolutionized the way people perform crunches," according to the company's website. Twenty years later, the Ab Roller now boasts sales exceeding $1 billion worldwide.
There's a reason products like these sell: They promise to shrink, tighten, or tone what many people would call their "trouble zones." And with consistent, proper use, they very well may deliver results. But there's a better way.
Instead of collecting products that promise to banish fat from one specific area—which may leave you frustrated—focus on building strength in and around those muscle groups. You’ll not only add lean muscle to your frame, which helps increase the number of calories your body burns at rest and therefore promotes overall fat loss, but you’ll also be able to perform everyday activities with ease.
“Getting out of a chair, going upstairs, carrying things … All those activities require your thighs and butt to lift stuff, and your core to stabilize,” says Jason Machowsky, R.D., C.S.C.S., a sports performance specialist at the Hospital for Special Surgery in New York.
The best part: You can strengthen your core, butt, and thighs with just a few basic exercises. Check out the multitasking workout below from Machowsky to target all your trouble zones (and more) at once.
Get and stay fit with SilverSneakers! Choose from dozens of different Community classes, visit a participating fitness location, or view the current schedule of SilverSneakers LIVE online classes here.
How to Do This Workout
Do all sets of each exercise before moving to the next. For best results, Machowsky recommends starting with two to three sets of each move three days per week. As your fitness improves, you can add a fourth day, or you can modify the exercises to make them more difficult using the tips below.
“The routine should feel challenging, but you shouldn’t end your workout feeling totally worn out either,” Machowsky says.
If you ever feel your form breaking down, do fewer total reps. The quality of your movement is more important than knocking out the maximum number of reps.
Ready to get started? Here’s how to perform each movement. As always, safety is key. The exercises here may be different or more advanced than those you’ll experience in a SilverSneakers class. If you have a chronic condition, balance issues, or injuries, talk to your doctor about how you can exercise safely.
Exercise #1: Bent-Arm Plank
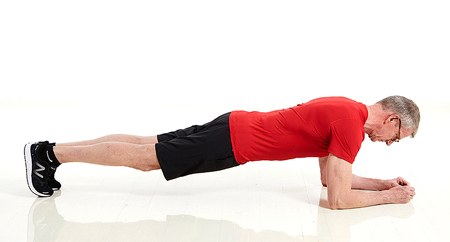
Do 2 to 3 sets of a 30-second hold
- Lie on your stomach on the floor with your elbows directly underneath your shoulders and forearms flat on the floor.
- Focus your eyes between your hands. Your legs should be resting behind you, knees hip-width apart (or slightly farther apart for extra balance).
- From here, lift your hips toward the ceiling until your body forms a straight line from head to ankles, and squeeze your upper back, core, and glutes.
- Hold this position for 30 seconds.
- Do two to three sets, resting 30 to 60 seconds in between.
Make it easier: Hold your plank as long as possible, rest, and repeat until you reach 30 seconds total. Or do the move with your knees on the floor, and lift your hips so your body forms a straight line from head to knees.
Exercise #2: Side Plank

Do 2 to 3 sets of a 30-second hold per side
- Lie on your left side with your legs extended and hips stacked.
- Prop your upper body up on your left elbow and forearm. Your left elbow should be bent 90 degrees and be positioned directly under your shoulder.
- Brace your core by contracting your abs forcefully as if you were about to be punched in the gut. Raise your hips until your body forms a straight line from your ankles to your shoulders.
- Hold this position for 30 seconds, or as long as you can.
- Switch sides so that you’re lying on your right side, and repeat.
- Do two to three sets on each side (30-second hold = one set), resting 30 to 60 seconds between sets.
Make it easier: Hold your side plank as long as possible, rest, and repeat until you reach 30 seconds total. Or do the move with your knees bent 90 degrees and your bottom knee on the floor. Lift your hips so your body forms a straight line from shoulders to knees.
Exercise #3: Glute Bridge
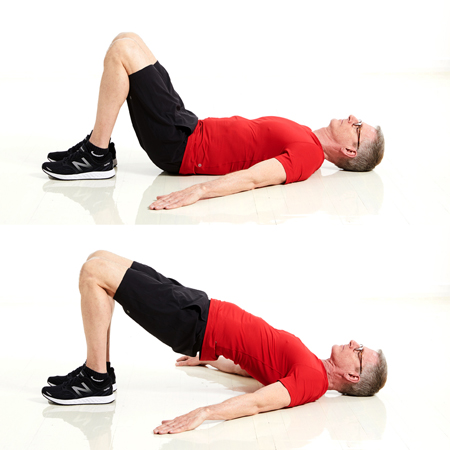
Do 2 to 3 sets of 10 to 12 reps
Subscribe to our newsletter
It's quick and easy. You could be one of the 13 million people who are eligible.
Already a member? Click to discover our 15,000+ participating locations.
Follow Us
- Lie on your back with knees bent, feet flat on the floor about hip-width apart, and heels a few inches away from your buttocks.
- Press your arms into the floor for support, and brace your core to minimize the arch in your lower back.
- From here, push through your heels and squeeze your glutes to lift your hips up until your body forms a straight line from your knees to shoulders.
- As you get stronger, focus on getting your shins as close to vertical as you comfortably can at the top of the movement.
- Pause, then slowly lower your hips to return to starting position. That's one rep.
- Perform two to three sets of 10 to 12 reps, resting for 30 to 60 seconds between sets.
Make it harder: Perform the bridges while holding a light weight by both ends against the top of your hips. It should sit right in the crease of your hips.
Exercise #4: Side-Lying Leg Lift
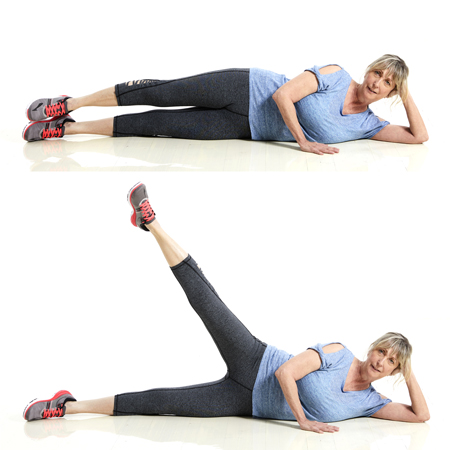
Do 2 to 3 sets of 6 to 10 reps per side
- Lie on your left side with your legs extended and hips stacked.
- Support your head in your left hand, and place your right hand on the floor directly in front of your torso for support.
- Flex your top (right) foot so your toe is pointing forward.
- Keeping your heel slightly behind your body and your toes pointing forward, slowly raise your top leg as high as you can.
- Pause, then return to starting position. That's one rep.
- Do two to three sets of six to 10 reps on each side.
Make it harder: Wrap a resistance band just above your knees, and perform the movement.
Exercise #5: Stepup
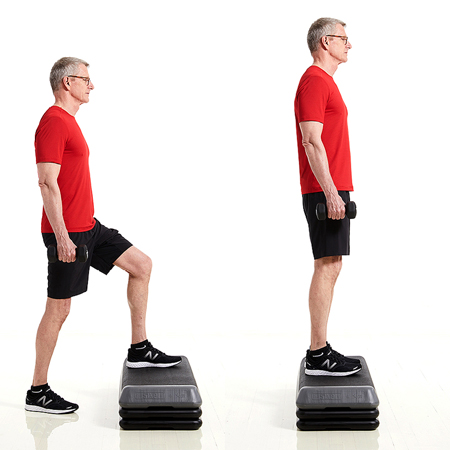
Do 2 to 3 sets of 6 to 8 reps
- Stand in front of a step. Start with a low step, increasing the height for a challenge.
- Set your left foot on the step, push down through your heel, and lift yourself up until your leg is straight.
- Step down. That’s one rep.
- Perform six to eight reps or as many as you comfortably can, then repeat on the opposite side to complete one set.
- Do two to three sets, resting 30 to 60 seconds between sets.
Make it harder: Grab a pair of light dumbbells, and hold them at your sides with palms facing your body as you perform the movement.
Take Your Favorite SilverSneakers Classes Online!
SilverSneakers members can access live fitness classes and wellness workshops through SilverSneakers LIVE. See the latest schedule and RSVP for classes here.
Not a member? If you have a Medicare Plan, it may include SilverSneakers—at no additional cost. Check your eligibility instantly here.
Not eligible for SilverSneakers? You can still get 200+ free SilverSneakers On-Demand videos and stay in touch with us by creating your online account.